5 Great Tips for Creating Mathematical Resources in Microsoft Office

If you've ever struggled to format maths equations on a computer or lost an afternoon wrestling with the composition of a Cartesian plane for a maths handout, this blog is for you.
HSC Maths guru, Steve Howard, outlines his top tips, tricks and keyboard shortcuts for entering complicated mathematical expressions quickly and easily.

One of the main technological barriers in Mathematics is the ability to express and present mathematical expressions via a computer. Typing and formatting fractions, square roots, equations, symbols, subscripts etc can be laborious, frustrating and slow.Producing mathematical objects, such as number planes, shapes, solids, times table charts and common curves is a painfully fiddly and time-consuming process.
No wonder most teacher cringe when it is their turn to right a test from scratch!
The computer keyboard is still a typewriter, designed for writing words. This is why doing mathematics using a computer keyboard is so problematic. Using a mouse and menus is generally too slow for practical use.
When you see how quickly you can enter complicated mathematical expressions using just the keyboard in Microsoft Office you will be amazed! This blog will cover some of the basics so you can explore for yourself.
What platform should you use to create your work?
When we decide which program we should use to create our work some of considerations are:
- Is it quick to use?
- Is it easy to use?
- Is the final result neat and presentable?
- Can other teachers open and edit the file when I need to share?
- Will I still be able to use the files in ten or twenty years time?
Microsoft Office
For these reasons above, my go-to program is part of the Microsoft Office suite - pretty much everyone has access to it and it should be around for many years to come. If you know how to use the keyboard shortcuts (and how to personalise them), it is quick and easy to use.
Many of you will automatically think I mean Microsoft Word, but my 3000+ pages of mathematics have all been written in PowerPoint! I cringe when someone shares a Word file and I have to use that - I often cut and paste into PowerPoint, work on it there, then move it back!
Main advantages of using PowerPoint over Word:
- when you place something on a slide it doesn’t move around as you add other objects above
- it easier to align equals (=) signs
- it is easier to work with shapes and lines (say when creating a sketch on a number plane)
LaTeX
But what about LaTeX I hear some of you ask?
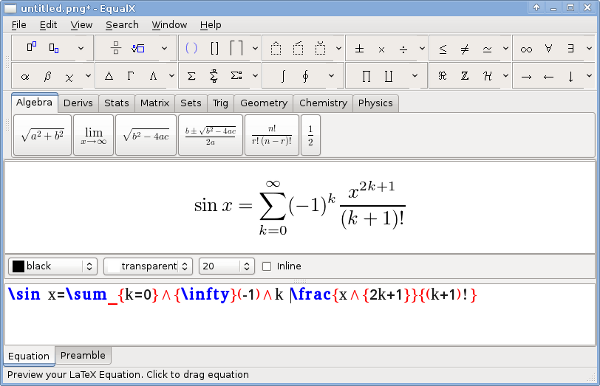
For those who don’t know LaTeX is a high-quality typesetting system that produces beautiful looking mathematics - it looks much more professional than the same work created using Office. I love the look of the end product but I have yet to see a way of using it that would allow me to produce the volume of work I need quickly enough. It is also much more difficult to share work with others who have not mastered using LaTeX. Hopefully it should stand the test of time, so you will still be able to reuse your work ten or twenty years from now.
This blog will focus on the Microsoft Office equation editor and how to use it more efficiently. All the tips will work in PowerPoint, Word, OneNote, Outlook (the full version) and Excel. There are also some hints on more easily adding objects more easily.
1. Use Keyboard Shortcuts
Keyboard shortcuts in MS Office Equation Editor are much quicker than using the menus
I almost never use the menus at the top of the screen, unless I need to find an obscure symbol; they are so slow and clunky. Let's look at example of how to type the simple expression y = x² - x³ using keyboard shortcuts, versus using menus.
Don't do this: Using menus to type the expression y = x² - x³
First of all, let's look at all the individual steps necessary to type this expression using the menus at the top of the screen:
- Move your hand from the keyboard to the mouse or trackpad
- Move the cursor to the top left and click on Insert in the menu
- Move the cursor to the top right and click on Equation
- Move your hand back to the keyboard
- Type y =
- Move your hand to the mouse or trackpad
- Move the cursor to the top middle and click on Script
- Move the cursor down and click on

- Move your hand back to the keyboard
- Back arrow twice
- Type x as the base
- Forward arrow once
- Type 2 as the exponent
- Forward arrow once to move out of the exponent
- Type - (minus sign)
- Move your hand to the mouse or trackpad
- Move the cursor to the top middle and click on Script
- Move the cursor down and click on

- Move your hand back to the keyboard
- Back arrow twice
- Type x as the base
- Forward arrow once
- Type 3 as the exponent
- Forward arrow twice to move out of the equation editor.
Phew! What an effort just to type a simple expression. A lot of the issue is the continual swapping between keyboard and mouse/ trackpad.
Do this: Using keyboard shortcuts to type the expression y = x² - x³
Now let’s look at how we can type this same expression using the keyboard only. Some of the shortcuts we will use are:
- To open the equation editor on a PC we press Alt and = simultaneously. This is shown as Alt+=.
On a Mac press Ctrl and = simultaneously, shown as Crtl+=. - We will use the circumflex symbol ^ (which is above 6 on most keyboards)
- We press the space bar to ‘build up’ the equation. This is shown as <sp> below.
Here we go...
- Type Alt+= to open the equation editor (this is for a PC, or use Crtl+= on a Mac)
- Type y = x ^ 2 - x ^ 3 <sp>
- Forward arrow once to move out of the equation editor.
Done! Three steps instead of 24. How much How much quicker was that!
2. Learn the Shortcuts
Where do you find the shortcuts?
For a comprehensive list of shortcuts go to pages 40-48 in this UnicodeMath document: https://www.unicode.org/notes/tn28/UTN28-PlainTextMath-v3.1.pdf.
However, this involves a lot of wading through pages of information.
The easiest way to learn the common expressions you will actually use is to create an example using the menus, then convert from ‘professional format’ to ‘linear format’.
For example, say you want to learn how to type:
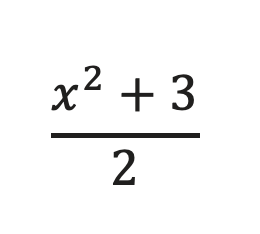
This is displayed in ‘professional format’ as it is displayed the way would write it on paper, but it doesn’t help you learn how to type it yourself.
To learn the keyboard shortcuts, you can type it once using the menus, then convert it to linear format, where you will see:
(x^2+3)/2
Here you can see that brackets need to surround the numerator, the circumflex creates the power and the forward slash creates the fraction.
So if you then want to type:
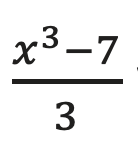
you can press Alt+= then type (x^3-7)/3 then press the space bar to build it up into professional format.
How to switch between professional and linear formats
Each of the Office programs are slightly different in their set ups.
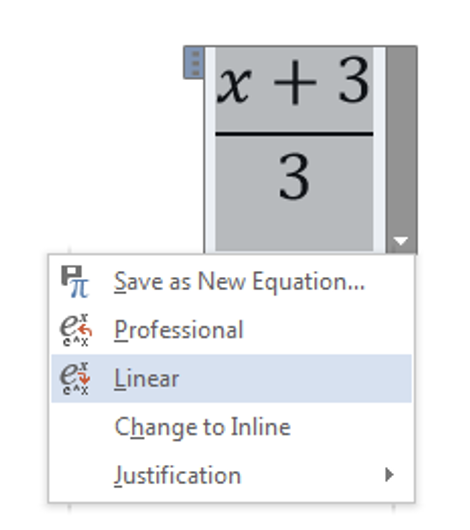
Say we have the following fraction in professional format and want to convert it to linear format.
| Professional: | Linear: |
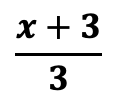 |
(x + 3) / 3 |
In Word and Outlook you can click on the bottom right corner of the equation editor and select ‘Linear’.
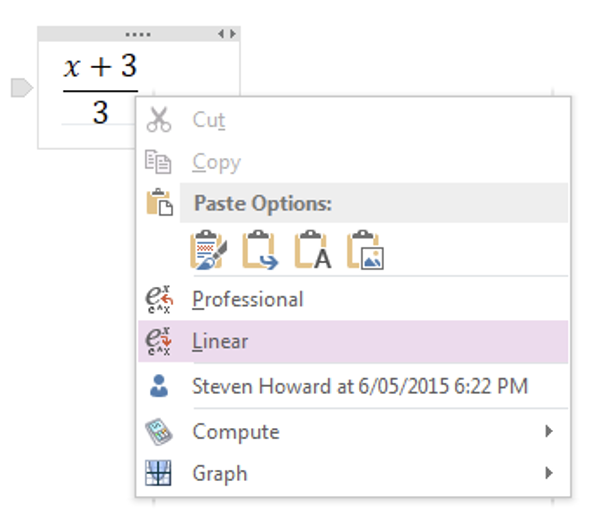
In OneNote, right click on the expression and click ‘Linear’:
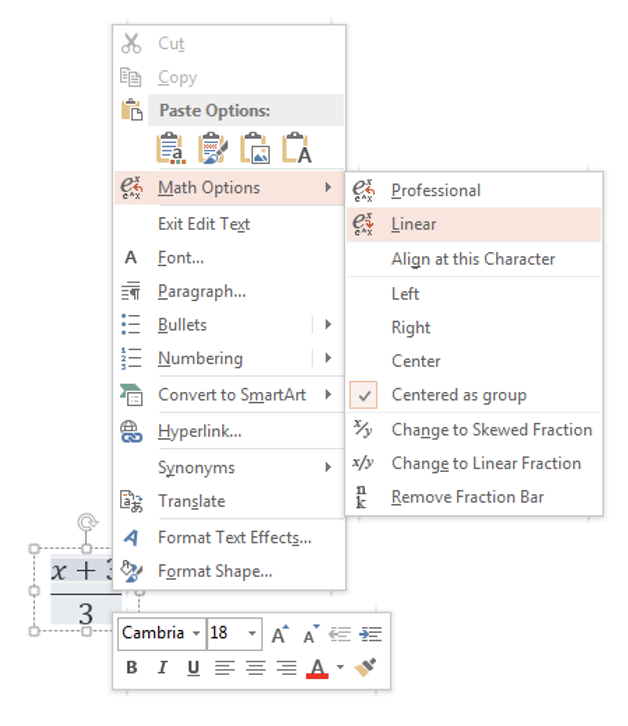
In PowerPoint and Excel, right click on the expression, then click Math Options > Linear:
3. Customise your shortcuts
The default shortcuts in MS Office are quite useful, but we can make our work even quicker and more easily by creating our own shortcuts.
As a simple example I rarely press the + sign, as it involves holding down the Shift key and reaching up to the = key. Instead I give two quick taps to the minus sign and it is automatically changed into a plus sign. We will look at how to do this in a moment.
As background, all of the Office programs share common AutoCorrect and Math AutoCorrect lists. If you adjust either list in any Office program it is automatically shared with all the other programs. The Math AutoCorrect list only works inside the equation editor, while the AutoCorrect lists works everywhere else in the document.
Example: Change two minuses into a plus
Let’s look at how you can get your computer to change two minuses into a plus. The screenshots are from PowerPoint, but you will be able to make the change in Word etc.
-
Open the Math AutoCorrect list
Select File > Options > Proofing > AutoCorrect Options
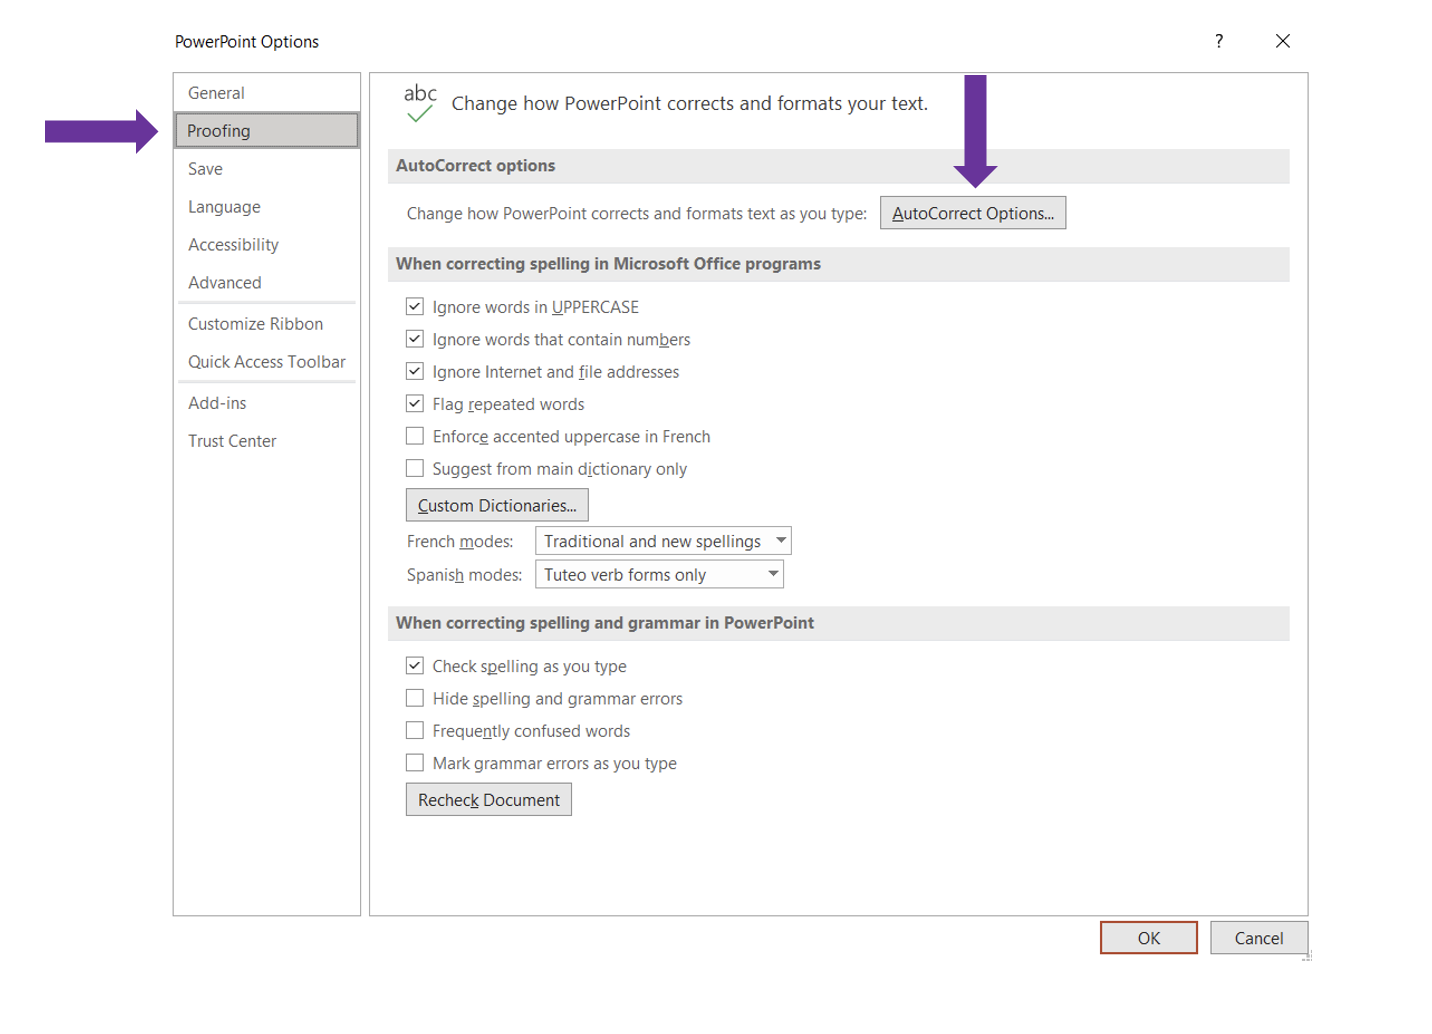
Then select Math AutoCorrect:
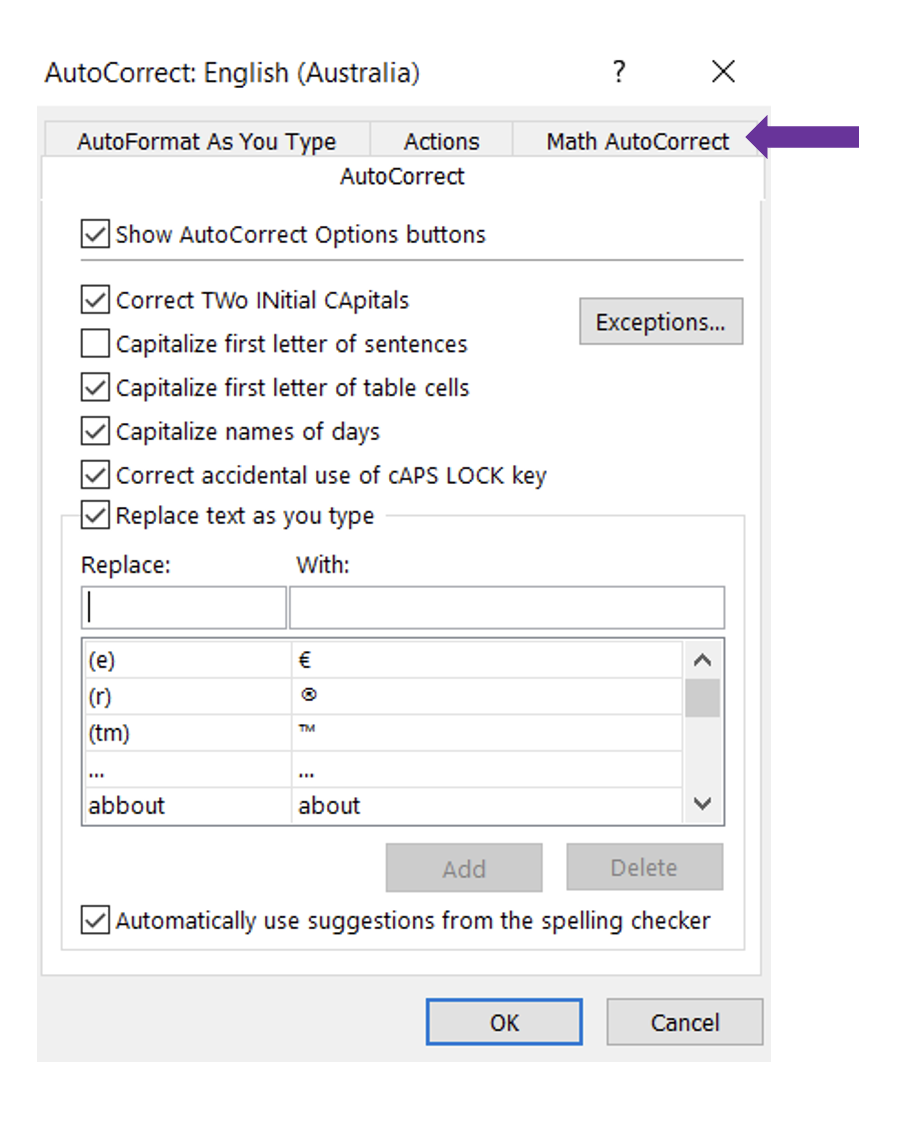
-
Define your shortcut
Now enter a double minus sign ( --) in the ‘Replace’ field and a plus sign (+) in the ‘With’ field then click ‘Add’ then ‘OK’.
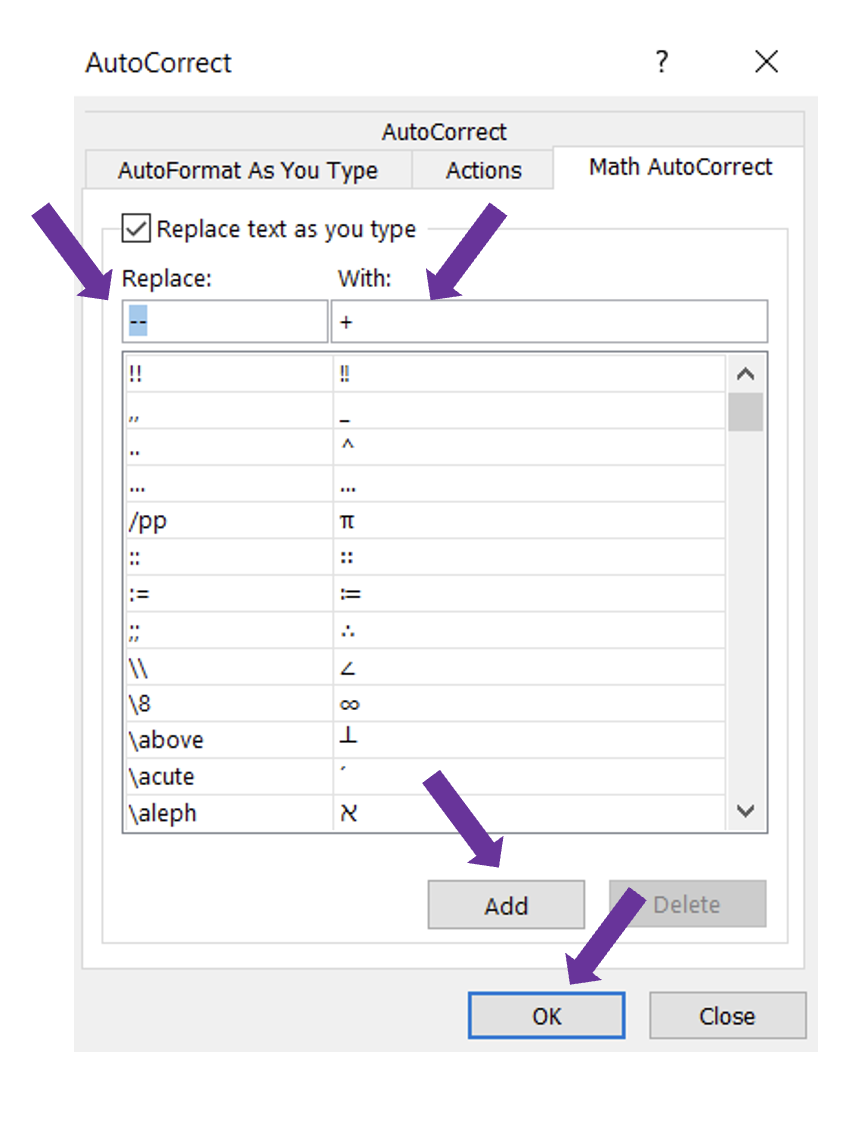
Now whenever you want a plus sign in equation editor , you just hit the minus sign twice, then press <sp> or the next number for the minus signs to be replaced with the + sign.
If you want the same shortcut to work in the rest of the page then enter the same substitution into the AutoCorrect list.
You can replace pretty much any input with anything you want. I used to have ‘hoo’ replaced by ‘Hence, or otherwise’ in AutoCorrect. You can have shortcuts replaced by whole paragraphs, equations or expressions.
Here is a small sample of the shortcuts I use - just pick anything that you will remember, and which is easy to type, onto the keyboard (avoid having to use the Shift key):
| Replace | With |
| -- | + |
| // | ÷ |
| \x | × |
| " | − |
| \r | √ |
| \8 | ∞ |
| ;; | ∴ |
| .. | ^ |
| == | &= |
| \T | ⊥ |
| \\ | ∠ |
| \d | ° |
| aa | α |
4. Practise using keyboard shortcuts
When you first start using the keyboard shortcuts you will probably find that, while it is quicker than using the menus, it is not as quick as you would like; you still have to consciously think about what to type.
Just like playing the piano it takes regular practise. Over time, repetition allows you to achieve automaticity - your brain subconsciously directs your fingers to the right keys so your conscious mind can focus on the maths.
It never becomes as quick as writing on paper, so part of your working memory is always required to type the work.
As teachers we only type our work so that it is presented professionally, and sometimes to save space.
And that leads directly onto Tip 5 ...
5. Don't get students to type their work!
Typing mathematics is not recommended during the learning phase for students. Multiple studies have shown that handwriting (either on paper or on screen) leads to deeper understanding more quickly.
Using a pen is more intuitive so students can use more of their working (short term) memory for Mathematics, rather than having to think about how to type in expressions or insert objects (tables, graphs etc) at the same time.
Writing activates areas of the brain that typing cannot, and improves memory of the work and conceptual understanding. Students tend to summarise, paraphrase and create more diagrams, which involve higher order thinking. Lower ability students have less cognitive load so are better able to keep up with their peers.
I know that when I work out solutions on a computer I remember and understand less than when I use pen and paper.
Using a keyboard can reduce a student’s ability to learn, as they are forced to simplify their working, including more emphasis on words and less on expressions and diagrams. On a keyboard students enter work more slowly and make more mistakes compared with writing. Students will write more on a keyboard, but it tends to be more verbatim copying, rather than involving deeper thought.
* * *
In a few years, once existing software advances slightly and touchscreens become more affordable (and more robust), we can expect that teachers and students will be able to write and draw on screen and have their expressions and objects converted to neatly typed and presented mathematics, which will give us the best of both worlds.
We will be able to automate the lower order skills (like drawing a Cartesian plane with numbers along each axis), leaving more time for the higher order skills (like properly graphing an equation onto the Cartesian plane).
